The Node Explorer window is on the left side which allows you to navigate through the hierarchy structure from a root to a specific node to get analysis statistics from global to one selected node.
The Node Explorer window contains the following components:
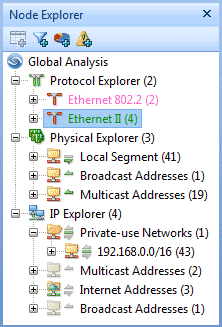
The hierarchy has three root nodes (figure below):
 You can expand and collapse the hierarchy by keyboard. press UP or DOWN ARROW key to move up or down on the nodes, press LEFT ARROW key to collapse the structure till root node and press RIGHT ARROW key to expand to the sub-nodes till last node.
![]() * The Free edition only analyzes up to 50
local IP addresses in IP Explorer, while other editions have no such a limitation.
* The Free edition only analyzes up to 50
local IP addresses in IP Explorer, while other editions have no such a limitation.
You may notice arrow icons before each node with different directions and colors. The green arrow indicates the node is transmitting packets, the gray arrow completed transmission. The upper arrow indicates packets transmitted in, the below one indicates packets transmitted out from the node.
Before transmission arrows, there are icons indicating the address type of the node,  specifying that the address type of the current node is broadcast address, and
  Internet address.
The Node Explorer window has the following buttons (figure below):
A node selected and this icon clickable, click it (or right click the node and choose Add to Name Table) to open a dialog box to add an alias of the node into the Name Table.
A node selected and this icon clickable, click it (or right click the node and choose Generate Filter) to open a dialog box to create a filter based on the node.
A node selected and this icon clickable, click this icon (or right-click a node and choose Make Graph) to open a dialog box to create a graph based on the node.
Click OK in the Make Graph dialog
box, a prompt box appears to ask if you would like to see this graph. Click YES, you will be redirected to the created graph in Graph tab. If you need to create another graph, click NO to continue to create graphs and click YES to show them until you done.
A node selected and this icon clickable, click it (or right click the node and choose Make Alarm) to open a dialog box to create an alarm based on the node. Successful created, a prompt box shows up to tell that the alarm created successfully, click OK to close it.
| Back |
| Copyright © 2001 - 2011 Colasoft. All rights reserved. |