Email Monitor & Auto-saving Email Content
Some people may doubt if it is legal to monitor email of employees with an email monitor software (aka. email spy or email checker), but this is not the topic of this article. We are going to discuss how we can monitor email with some technical methods, especially how we can monitor email with this packet sniffer Colasoft Capsa. Email monitor is a new functionality of Capsa, which not only logs the activities to tell you who has sent a mail or received a mail but also duplicate a copy of the mail to a local folder, including the mail body and its attachments. Let's see what we should do to start monitoring the email messages.
Step 1. Still we need to install the latest version of Capsa and deploy it correctly.
Step 2. Run Capsa and start a new capture
Capsa initiated, we come to the Start Page and we should choose a Network Profile and an Analysis Profile. There are some settings in the Analysis Profile that we should configure:
- IM Analysis Module
- Log Settings
- Save Mail Logs
- Save Mail Content
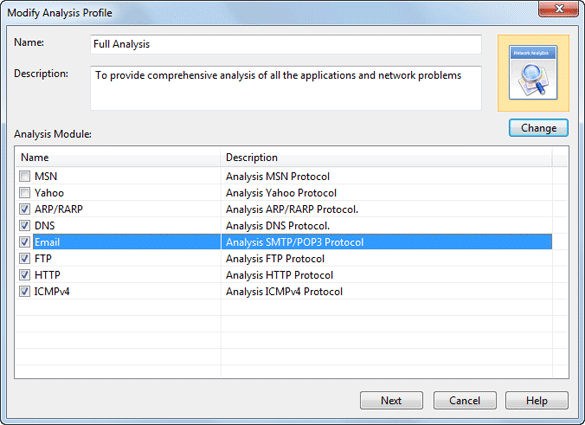
1. To analyze emails, we should first enable Email analysis module. Double-click on an analysis profile icon; check the Email module in the Modify Analysis Profile dialog box. Then click Next and we will see the Analysis Profile Options dialog box.

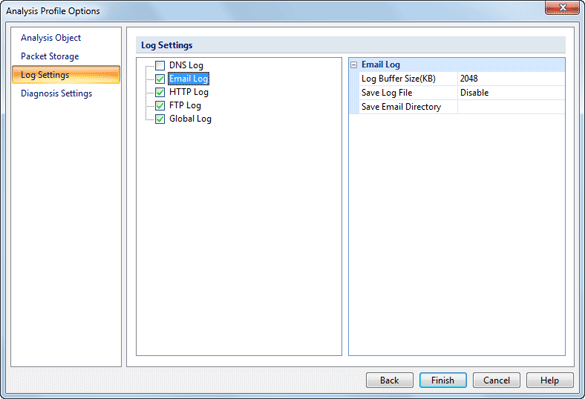
2. To display log records in the Email Log view of the Log tab, we should check the Email Log checkbox in the Log Settings page of the Analysis Profile Options dialog box.

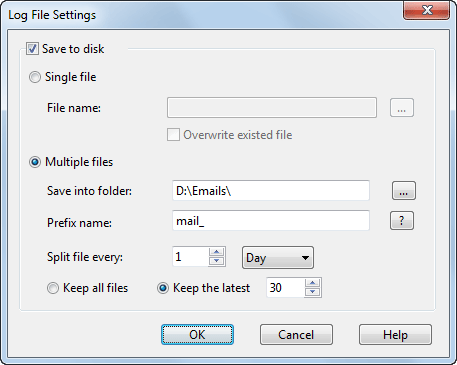
3. To save the log records to a file, we must set the Log File Settings in the Log Settings page of the Analysis Profile Options dialog box. We can decide to save the logs into a single file of into multiple separated files.

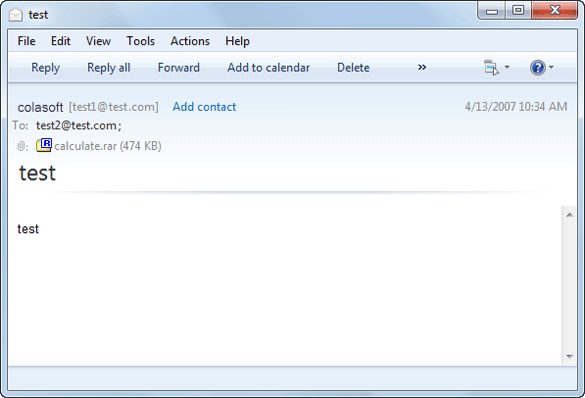
4. To make a copy of the email content, we need choose a folder to keep them in the Log Settings page of the Analysis Profile Options dialog box. All emails will be saved in .eml format. If you are using XP, you can open the email files with its own Outlook Express, but if you are using Windows 7, you may need to download a Microsoft Live Mail or Foxmail.
Close OK to close the dialog box to go back to the Start Page. Click Run button to start a new capture and open the Log tab.
Choose Email Log in the Log tab and we will see all the email activities on your network. The log records tell you information of the time, client IP address, server IP address, tile of the email, account, and so on. We can click the Export icon to export the logs to a CSV file for further analysis to find out the anomalies of email usage. If we enabled save email content to disk, we can open the email in your email client by double-clicking a log record.
