Chapter 7 - Download Packets & Analyze Packets with Built-in Analyzer
In this lesson we'll see how to download the packets (remember that all packets are saved on the server) to a local file. And then we can use the network analysis tools, like Capsa, to look into the packets.
Before we jump into this chapter, we need to understand that the packets are on the nChronos Server and we are just using nChronos Console to view the traffic analysis stats on our laptop. This means the Server and Console talk through network. Knowing that the Server has been capturing packets from the network for a long time and there might be hundred gigabytes of packets stored on the Server, it is definitely not a good idea to download all of the packets to our laptop through the network. Also this might be devastating to the Server because it takes a lot of CPU usage to process this job and it will affect the analysis performance. We need to notice that when we are downloading packets, the server is still capturing, analyzing and storing the packets.
Well, don't worry. We could still download packets from the Server. We just need to download the packets we need. We could always use the drill-down feature to narrow down the time range, IP addresses counts and packet counts that we need for deeper analysis. For example, we need to check all packets that related with the email server only between 23:00 – 23:15 PM yesterday. So here we know we should first select the time range, from 23:00 – 23:15 PM, last night. And then we can go to the IP Address view, and find the email server's IP. Then we check the checkbox of this IP, right-click on it and we have three options on the menu: Download Packets, Analyze Packets, and Decode Packets.
Decode Packets
Decode Packets allows you to quickly lunch Expert Analyzer to decode packets of selected records. This feature will provide you more details about the packets from certain IPs, conversations, or applications that you want to look deeper into.
To use this feature, please select the records that you want to check for details. Then you can right click on the selected records and click Decode Packets. Or, you could click the button on the tool bar to quickly launch Expert Analyzer to decode packets of all the records under the selected objects.
Analyze Packets
By using Analyze Packets, nChronos Console will launch the Expert Analyzer to analyze the packets of selected records. Analyze Packets is kind of similar to Decode Packets. Although it takes a longer time to launch the Expert Analyzer than Decode Packets does, it allows you to do more with it. The Analyze Packets button will launch the whole Expert Analyzer, which you could set capture filter to focus on the IPs or the protocols you care. You could also view the log in the Expert Analyzer. Analyze Packets is kind of like using Capsa to do the packets replay.
- Click
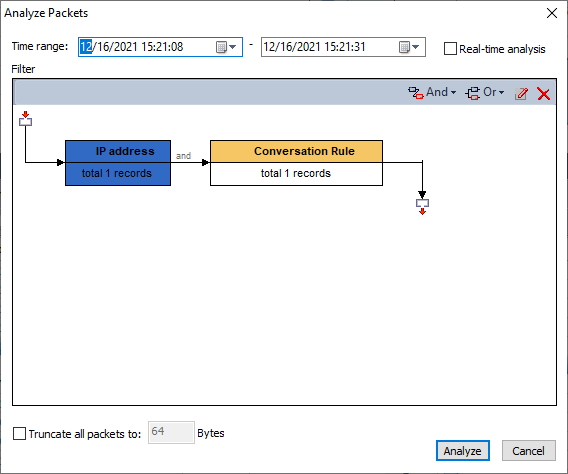
 on the toolbar of the analysis views to open the Analyze Packets dialog box, which shows as the following figure:
 - Time range: Shows the packets of which time period will be analyzed. You can set the range by typing directly or by pressing the appropriate arrow keys. By default, if a range is selected on the Time Window, the range will be the selected range; and if no range is selected on the Time Window, the range will be just the same as that of the Time Window.
- Real-time analysis: When this option is enabled, nChronos starts to analyze packets from the latest moment until the analysis project is stopped manually.
- Filter: Shows the filters to separate particular packets. You can click And/Or to define filter conditions.
- Truncate all packets to: When this option is enabled, all packets will be truncated to the specified size.
- Complete the Analyze Packets dialog box, and then click Analyze to open the Expert Analyzer user interface.
For more information about Expert Analyzer, you can press F1 when loading Expert Analyzer to get the Help document about Expert Analyzer
Download Packets
By using Download Packets, you could download packets of the selected records from the server. Then you can use the network analysis tools, like Capsa, to look into the packets. Download Packets is different with Analysis Packets. Download Packets will download the packets from the server and save it on your hard disk, while Analysis Packets download the packets from the server to the RAM for analysis. Also, Analysis Packets will automatically open up the Expert Analyzer to analyze the packets you select, but Download Packets only downloads packets, and you need to us the network analyzer, like Capsa, to replay it for the analysis.
- Click
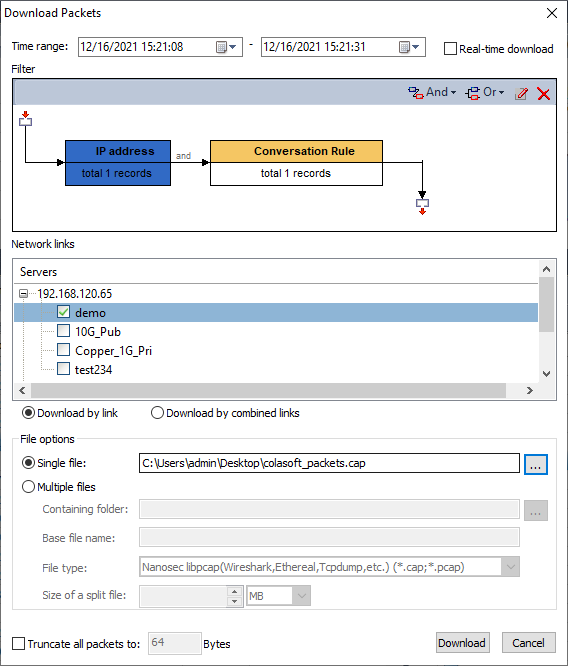
 on the toolbar to open the Download Packet dialog box which shows as the following figure:
- Complete the dialog box and click Download.
The Download Packets dialog box
- Time range: This option is for specifying the packets of which time range will be downloaded. You can just click the numbers to specify the time or click the little triangle to specify the time. By default, the time range is just the one that you select on the Time Window.
- Real-time download: When this option is enabled, nChronos starts to download packets from the latest moment until the download is stopped manually.
- Filter: This option is for filtering out unnecessary packets. You can set the filter according to application, conversation, address, port, and network segment with logical AND rule and logical OR rule.
- Download by link: When this option is enabled, the packets will be downloaded separately according to network links.
- Download combined: When this option is enabled, the packets from multiple network links will be downloaded together.
- Single file: This option is for downloading the packets of selected time range as one file. You can click
 to specify the file path and the file name.
 - Multiple files: This option is for downloading the packets of selected time range as multiple files. Once you select this option, you should set the following options:
- Containing folder: This option is for specifying the folder for storing the multiple packet files.
- Base file name: This option is for specifying the prefix of the packet file name.
- File type: This option is for specifying the packet file format to store the packets. You can store the packets in .rawpkt format and in .cap format.
- Split size: This option is for specifying the file size of downloaded packets. The downloaded packets will be automatically split into multiple files according to the split size.
Truncate all packets to: When this option is enabled, all packets will be truncated to the specified size.